


A Shop-made Fret Bevel Tool
By Peter O'Connor
Featured earlier in this issue is a book review of Brain Forbes' excellent "Acoustic Guitar Making: How to Make Tools, Templates, and Jigs". Inspired long ago by Brian's book, I now make a lot of my own tools. Brian's book includes details on how to make your own fret bevel tool, and this is my version that adds a few features that were important to me.
A fret bevel tool rides along the neck, creating a consistent bevel in newly installed frets. Often this is performed by simply hand holding a file, but this takes a bit more time, and will not produce as consistent results. At the time of writing, a fret bevel tool offered by possibly the best-known online American source of luthier's tools, is being sold for $80 USD. I can't really imagine why the price is so high, except that the entire block is made of what might well be UHMW polyethylene, and this material is not particularly cheap. However, since only the surface of that material slides along the frets, I can think of no reason why the entire body of the tool should be made using that material.
There are many reasons to make your own tool: this is a very easy tool to make; the cost of making the tool is quite low; making your own means you can choose the angle of the file and consequently the angle of the beveled fret ends; you can make a tool that exactly meets your needs (for example, the commercial tool mentioned is a simple block, without contours, and I don't expect it would be as comfortable to use as this shop-made tool); assuming there are other practical reasons for making your own tool, doing so is a satisfying exercise, as is ultimately using the tool.
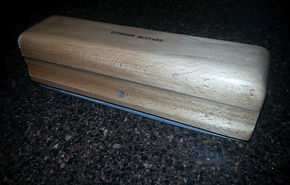
As mentioned, making this tool is very simple. I started with a block of maple, 7 1/2" long, 2" high and 2" wide. I angled the table saw blade (35 degrees is typical, but use whatever angle you prefer) and created the channel for the file. The tang was removed from the file, a very cheap file, you don't need anything better for this application.
I used a round-over router bit on all the external edges of the block except the three that will be covered by the UHMW material. I then cut a thin piece of UHMW to size, drilled and countersunk the
holes and attached the material to the block (to one side of where the file will be situated, since the other surface comes into contact with only air). I then ran both sides of the block over a large core box bit, in overlapping passes, to create an ergonomic surface.
A recurring theme in Brian's book is to take care and pride in creating tools and jigs. A tool that is well made and finished will last longer, be used more often and will be taken care of. I am completely convinced by Brian's viewpoint and consequently spend a little time finishing all tools and jigs nicely (prototype experiments such as the neck carving jig that appears elsewhere in this issue are an exception). I applied shellac and then stamped "O'Connor Guitars" into the tool.
Finally, I installed the file. This can be epoxied, but Dan Thrasher suggested a set-screw so the file can be replaced if the need arises. Voila! A nice, useful customized tool, made for far cheaper than the cost of purchasing a commercial offering.
SOLG Newsletter - Issue 2 - September 2020
Page 21