that good results were probably possible, if I could make some improvements. Using rough lumber as a proxy for a neck and as I didn't want to consume any hardwood at this stage of the jig's development, I was left to wonder how much difference good wood might make.
Results were very good near the centre of the "neck" but degraded significantly towards the sides, where there were marked ridges. None of the videos I had seen revealed what type of bit others had successfully used and I initially employed a straight router bit. I planned to try other bits but before I got around to that I was discussing the jig and with another Guild member, Dan Thrasher.

The Benefits of Guild Membership
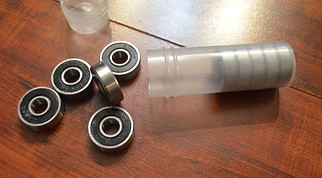
Since we were then, as we are now, in the middle of a pandemic, we were talking on the 'phone and I couldn't actually show the jig to Dan. He agreed that I could expect better results with good hardwood, but that any unsatisfactory results were most likely down to friction at various points. The threaded axles sliding up and down in the slots would be an issue, he suggested. Also, the aluminum cylinders would create too much resistance for the cams, resulting in uneven rotation. I mentioned that I would like to use some UHMW blocks (very low friction material) that would slide up and down the slots, but I wasn't sure how they would best hold the axles; could I simply drill a hole in the blocks and expect that a reasonably snug fit would hold the axles without slop but also allow free rotation? At this point Dan suggested I use "skateboard" bearings, available from Princess Auto.
I would never have thought of these bearings! In fact, I couldn't even picture them as he described them to me. The next day, Dan dropped a few in my mailbox for me to try, along with some plans that described the changes we discussed that I might make to the jig. Later in this article I give an overview of the current jig and how these bearings have been used in three different areas, but details aside, the salient point here is that the jig is now much better than it would have been without the benefit of talking to another Guild member who had experience that I lacked. This is one of the greatest benefits of Guild membership, the opportunity to share ideas and to learn from others.
The Second Jig
So the next task was to build another version with the benefit of lessons learned from the first. I'll summarize the changes now and then we'll look at the details.
Since version one was never intended to be anything other than a test-bed, it wasn't wide enough to allow the rotation of an actual guitar neck with an attached heel; I made this box wider. This extra width meant I could no longer have the router base slide directly on the rails. And in any case, wanting to make things run as smoothly as possible, I didn't want to have the base sliding on the wood. I built a sled (see the image on the following page) and decided this would be a good place to use the bearings Dan had introduced me to. I used aluminum rod for the axles, they are a tight secure fit, you just need to take care hammering the bearings on. Dan uses threaded rods, so certainly that's an option that works too, but I don't particularly like the idea of the inner surface of the bearing riding on the thin outer edge of only a few turns of the thread.
SOLG Newsletter - Issue 2 - September 2020
Page 16
