
_JPG.jpg)
_JPG.jpg)
_JPG.jpg)
_JPG.jpg)
Acoustic Guitar Back Strip Jigs
By Peter O'Connor
Three jigs that are used to create the back strip of an acoustic guitar.
These are three jigs of my own design that are used to cut acoustic guitar back strip veneers to shape, glue up the veneers and create a nice uniform rounded profile on the upper surface when the brace is viewed in cross section.
If you intend to build a single guitar, stop reading this article now, since it would be a complete waste of time making jigs. Even if you build many guitars, you would likely only find one jig helpful since the back strip is virtually always made from a cutoff from the soundboard, not veneers, and even then the jig isn't necessary.
So, why do these jigs exist? I use jigs because operations are quicker, results are consistent and errors less likely. And as I'll explain, I intend to experiment with veneers, and these jigs will help with this work.
The back brace is normally a single off-cut from the soundboard, with the grain oriented 90 degrees to that of the top (if the grain were to run the same way as the soundboard the strip would provide no strength and would be useless). I don't use kerfing on the rims, but solid wood, and have had success creating these from glued up veneers using molds, so I intend to experiment with veneers for the back strip. This will enable me to try different, attractive woods (albeit only seen through the soundhole), and I believe the glued-up veneers might be stronger.
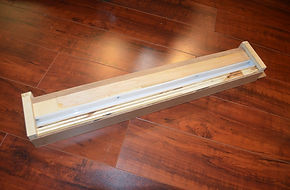
The first jig (top picture) is used for both the rim lining and back strip veneers and is not much more than a couple of slabs of MDF. The veneer is inserted between the slabs and a knife is used to produce a strip from the exposed veneer. I'm going to improve the jig by making the top slab slide on the lower so that the distance from the edge can be set with marked widths - versatile and no measuring required.
Viewed in cross-section, the jig used to glue veneers would appear as two interlocking "L's", one inverted. The top piece slides away from and towards the lower piece. All surfaces that glue might come into contact with are plastic - in fact, this is the case for all glue-up jigs I have made, as it is less wasteful, time-consuming and messy than alternatives such as using wax paper. This page's second image shows the jig in the open position, and the third shows where the clamps are placed.
The final jig has a channel that snugly guides a Japanese plane with a concave blade. The channel is lined with low-friction UHMW polyethylene. Both the plane and the UHMW came from Lee Valley. The plane body is wider than the blade, and the blade, at 3/4", is the width I prefer for the back strip. Difficult to see in the photo, but the UHMW base also has a shallow channel, 3/4" wide, which locates the back strip. I won't describe how the jig is used, since that should be obvious.
SOLG Newsletter - Issue 2 - September 2020
Page 10